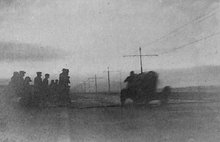
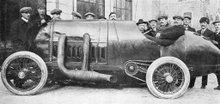
This 1950s/60s American “beat” dance invitation is my eccentric introduction to a story concerning the horrors of Fulvia front hub bearing replacement.

Q. Why are these men struggling with a long pole?
A. Because this time, a ¾” impact gun was not enough!
The Lancia Flavia and its descendent, the Fulvia were, it must be said, very well and indeed elaborately and expensively engineered. A splendid example of this is the hub bearing. A massive double deep-grooved ball race, this item is well known for often outlasting the car. It has been said that if water does not enter the bearing it will last indefinitely. Certainly on my own car I have a noisy rear bearing; there is no play at all, it is rust that is causing the noise. This bearing I am certain is an original and therefore forty years old! At Evolution Engineering, we used to recover the bearings from scrapped cars and strip them to check condition. Usually there was nothing wrong with them, so we used to rebuild them with synthetic grease and they were as good as new; I have two of these on my car.
However, despite the above, for one reason or another they do have to be replaced from time to time, and it’s a grim business. In this article I propose only to look at the front bearings.
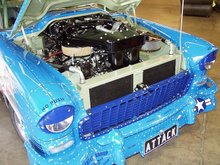
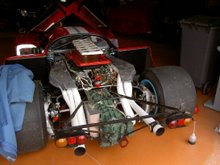
The Fulvia’s (and Flavia’s) front hub bearings are retained in the hub carriers by means of a very large (97mm) castellated ring screw, shown (regrettably a rather dirty – but realistic - example) in the picture below. It is tightened to something like 20 Mkg - about 150 lbs/ft, and in accordance with Lancia’s crazy policy, without any lubrication (I don’t care what you say – I think that this is insane). Given the very fine thread over such a large diameter and the fact that it is usually only after many years that the bearing must be changed, it is not difficult to imagine that unscrewing this ring screw is unlikely to be easy to say the least. Lancia was obviously concerned that it might unscrew itself (absolutely no chance) and so with the thoroughness for which the company was famous, it was locked in place with a spring – the green arrow in the picture indicates the “tongue” at the end of the spring which locates in one of the holes bored in the hub carrier thus preventing the ring screw from unscrewing itself…
 The famous front inner ring screw. The shiny part at the centre
is the inner race of the bearing
To replace a front hub bearing the procedure is as follows (see below for tool list):
1. Jack up car, remove road wheel. Support the vehicle on axle stands and chock the rear wheels
2. Undo outer bearing ring nut (nuts and vernier plate for S1)
3. Undo inner driveshaft bolts; remove driveshaft
4. Dismount brake caliper and tie up out of the way
5. Disconnect steering ball joint thus allowing hub to turn to provide sufficient access.
6. Remove locking spring and unscrew inner bearing-retaining ring screw
7. Insert “tool nut” (picture of tool nut below in Tools section) and mount special puller to hub and extract hub from bearing. (Note: sometimes the hub can be removed using two large pry bars or levers). Examine the hub carefully. If there is damage on the part that fits into the bearing then the hub should be replaced; repair is possible but would be very expensive I think.
8. The bearing may now be “drifted out” with care from the hub carrier. If “drifting” doesn’t work, then the bearing may have to be pulled/pushed out using either the tool nut and parts of the special puller or a long bolt and nut with suitable spacers and washers.
9. Clean the carrier carefully and with a little oil, fit the new bearing. Ideally, a suitable drift of about 90mm diameter will be available to push the bearing, acting on its outer race; do not act on the inner part as this can cause the bearing to “dismantle itself” as you will probably have found when removing the old one!. Once the thread is visible, the “Tool Nut” may be used to push the bearing home.
10. Clean the inner ring screw thoroughly, ignore Lancia’s instructions and coat it with “Copaslip” or similar so that if there is a next time, life will be a little easier! Tighten the screw – very tight - but so that the spring retainer will locate in one of the holes provided – usually it lines up OK.
11. Reconnect the steering joint
12. With light oil or WD40 or similar, introduce the hub into the bearing; gentle pushing with slight side-to-side movement is normally all that is necessary to push the hub into position. Great care must be taken since quite often the inner race will fall out and it is a pain to replace it since the rubber seal will have been disturbed. Don’t forget the distance piece which often falls out of the hub/disc assembly. It occurs to me that there might be an advantage in mounting the driveshaft first, since the outer CV joint will act on the inner race and perhaps prevent it from becoming dislocated. However I have never tried this.
13. Next, refit the driveshaft. Coat the splines with Copaslip or similar. Be sure to check the alignment of the splines (CV joint/hub). If all is clean then it should be possible to push the shaft through so that the thread at the end of the CV protrudes so that the ring nut may be started. You can then fit the six cap screws that secure the inner CV to the gearbox flange Do not forget the inner distance piece (S2/3 cars and 2000s only) which mounts between CV joint and the flange
14. Refit the brake caliper
15. Fit outer ring nut(s). This should be tightened to 27 – 33Mkg – or just lean on a four-foot (1.3 metre) piece of tube! There is often a need to adjust slightly on S1s to allow the vernier plate and dowel to line up properly. On S1s the outer locking ring nut is torqued to 7Mkg – say 53lbs/ft. “Stake” the ring nut.
16. Refit road wheel.
Fairly straightforward eh?
No it isn’t. The problem for the private owner (and garagistes who don’t know Fulvias) apart from having all the necessary tools is actually undoing that inside ring screw - and not just private owners. The picture at the top of this article shows what we had to do on one Fulvia, where the ¾” drive air gun was unable to shift the screw. A gun of this type can manage perhaps 80Mkg (800Nm or 600lbs/ft) or more of torque whilst simultaneously hammering…
In the picture we see two chaps leaning on a long steel tube, whilst the third is doing his best to keep the tool engaged in the castellations of the screw. There was a fourth person present, who took the picture – this was me. We always did this on tricky jobs to show the customer why the task had taken as long as shown on his invoice! Incidentally it was fortunate that we had two tools – one (with a ¾” drive socket welded to it) may be seen in the picture, the one we used accepted a very strong tommy bar.
After a considerable amount of straining and swearing, there was a loud bang. We thought the tool had broken, but in fact the screw had finally moved.
In extremis I suppose that after copious soaking with penetrating fluid it might be possible to shift the screw with an air hammer, but it is difficult to use these without damaging the work-piece.
In conclusion, I have to say that I cannot imagine any simple solution to the front (or rear) wheel bearing job on a Fulvia or Flavia. Probably the best way out would be for specialists to offer hub carriers (for the front) and hubs (for the rear) with new bearings fitted, on an exchange basis, but removing the hub carrier at the front is another difficult job in itself. Perhaps one day I’ll write a few words on this subject!
********************
Tools
(Apart from the obvious spanners, punches etc.)
Ball joint separator (for steering arm)
Drifts for bearing removal and fitting
Ring nut tool for outer CV retaining ring nut(s)
Ring nut tool for inner ring screw – and ¾” drive impact gun and good compressed air supply
“Tool Nut”
Special two-way puller
I shall add some pictures of special tools in the near future


2 comments:
Thanks again Paul for sharing your experiences. Reading this article it occurred to me that you had all these fancy home-made tools (the "green tin" attributes). I think for instance of the short piece of Allen key that will allow undoing the second gearbox drainplug, or that aluminium disc to hold the rocker screws wile tightening (I made one from an old 50 pesetas coin!). I'm sure a list of such special tools will be most helpful to the DIY Fulvista! Also, in order to avoid driving with the boot full of tools you packed as you went over all the possible troubleshooting that may be required on holidays, perhaps a list of what is really useful to help you out on the road (without the odd headgasket replacement under a lamppost..)?
Cheers,
Thomas
Hello Thomas,
Thanks for the comment - I hope that the Zagaot is all OK.
A good suggestion - I will certianly think of a list for the "trip" and post something in due course. I am a bit short of ideas for this blog at present although I do have another article prepared which will appear soon.
Rgds
Paul
Post a Comment