Adsense

A bit of music from the lamented Radio Blog Club

Le Français

Toujours, je suis désolé pour mes amis( et amies) français(es), mais il est difficile pour moi d'écire en français. Peut-être un jour...
S.V.P. regardez ce LIEN

Friday, August 07, 2020

Changes by Google

 This blog may disappear soon,  Google says it's all going to change and I cannot understand what I have to do to get it into their new format  The instructions are absolute crap and in no way conform to what is available.


 So if you like anything here I suggest you copy it!


Good luck

Friday, September 23, 2011

Flic Nicholson RIP

Flic Nicholson in action on the Rallye Vins-Macôn

I am sorry to have to announce the death of Felicity ("Flic") Nicholson after a long illness.

Flic was the very proud owner of the Fanalone, prepared at Barry Waterhouse's Evolution Engineering, that I have often mentioned here.

Flic started rallying in the late 1960s with a Triumph TR4 and later a BMW 2002. After a long break she returned to rallying with, initially, a SII 1600 Fulvia before switching to the Fanalone. She adored the car and loved to describe how, when on the limit, it seemed to "dance"; on outings with Integrales she especially enjoyed being the quickest downhill. She was twice Female VHC (historic rally in France) championne.

She will be missed by many friends, enthusiasts and competitors.

Sunday, February 20, 2011

Requiescat in Pace Lancia

It's official: Lancia is dead.

Yes there will be cars with Lancia (or the new ugh!) badges, but they will be Chryslers.

I think I would have found it difficult to have imagined a more inappropriate marriage... Much better to have killed Lancia altogether I think than to have ended with this disgrace.

RIP

A bientôt.

Friday, December 24, 2010

Merry Christmas

Hello.

Sorry it's been so quiet hereabouts; this has been due to a lack of Fulvia happenings here and also pressure of work (on such things as MGs and Jaguars).

The Fanalone didn't go to Corsica - there was a wheel-bearing noise - so we went in an Evo Perlato instead, which was pretty good! I have a bit to write about wheel-bearings again which will be soon.

Meanwhile I wish you all a very merry Christmas and all the best for the new year.

A bientôt

Monday, September 06, 2010

At long last!

... I have a sort of Internet connection.

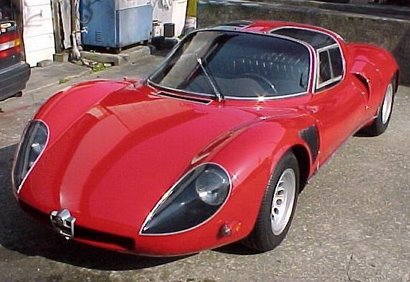
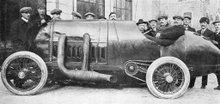
I was very slack in not providing regular updates about the Fanalone which is now running, quite nicely in fact, though it will need a cylinder head overhaul before too long. This will be in a while as the owner and I are going on a super trip to Corsica soon in the company of the Scuderia Lancia Integrale. These photos from last year should give you an idea of what's in store; I am very much looking forward to the trip as I am sure you can imagine.

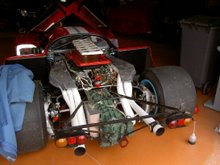
Meanwhile just to show I'm not making it all up, here's a phone camera snap of the Fanalone's subframe assembled:

This time I have two little suggestions some of you might like.

First a close-up from the above shot:

In about 1985, I bought a special spanner from Harry Manning, which happily I still have, for undoing those blasted carburettor nuts. Someone who has worked on the Fanalone though had a brainwave: he found M8 nuts that have "built-in washers" and are just 10mm across the flats; one can undo them with a ¼" drive 10mm socket; hurrah. I think that the nuts are fitted to Peugeots and of course they are lighter than the 13mm originals. Incidentally, I used 12mm AF Mercedes-Benz exhaust nuts on my car but these are much better.

As for the second idea this time, this arises from the following revolting picture - could almost be the subject for a competition:

No, it's not some sort of repulsive fruit de mer, it's the remains of a lower ball-joint rubber from the Fanalone. As regular readers will know, the car competed in 26 rallies; the owner had experimented with various brake pads, one set of which resulted in smoke and blue discs... The rubber which as you may know is VERY close to the brake disc was simply cooked and had become brittle resulting in greasy brake discs... Not good. So I have renewed both bottom ball-joints and to provide some protection for the rubbers, fabricated a couple of simple heat shields which I hope should help. And one does not want the changing of bottom ball joints to be regular work does one?:


Yes I know it's not truly artisanale metalwork, but they don't touch the discs and they should do the job!

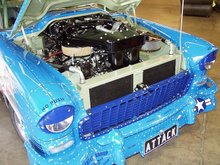
Finally, yesterday I went to a drag race meeting in Geneva - worth it to see a couple of 1500HP monster "saloons" doing sub- 9 second runs over 400 meters, but the reason I mention this is because the following car was there; sounded great and did a very respectable 13-second run. Perhaps one of my Italian readers can tell me what the words on the back window mean?


A bientôt

Sunday, July 11, 2010

Email Exchanges

One of my regular readers was unable to upload to the "comments" and as a result asked me to post the following email exchanges; the information should be of interest to all I think.

1.

Hi Paul,

I read your bottom end article with great interest and reading it I have three questions:

1 why have you used the cylinder base gasket if rigidity is such an issue? If you machine chambers for o-rings around the oil passages to the head and use a good silicon base sealant for the rest the stiff cast iron block directly bolted to the 'flimsey' crankcase will surely stiffen things up.

2 The 1600 engine you are working on has main bearing studs instead of bolts complicating the assembly but what is the reason to use them?

3 have you ever experienced with a mainbearing cap brace to stiffen up the running path of the crank?

Cheers,

william

PS I tried to upload these question via the blogger page but did not succeed.

2.

Hello William,


I suppose that I am speaking in rather "absolute" terms regarding the rigidity of the crankcase and this is not my car! We used to do what you described - 'O' rings etc. when I was in London - there we had the necessary facilities.

The crankcase was, as you know, originally designed for a 58HP 1100 saloon car so stretching the engine to 1600cc when the company was going broke was bound to lead to some compromises! The studs are lovely things, waisted for stress relief like the big-end bolts and the thread size is 12mm rather than 10 as on the 1300s; this is why my friend used a 1600 crankcase for his 1486 project. I have no iew really on the choice between bolts and studs, but the studs are not really more complex are they? I think I prefer studs to bolts though because I suspect that unless special dowel bolts are used, location is probably more accurate.

The idea of a main-bearing support was one we used to discuss a great deal and I believe that VERE Lancia offers one. An excellent idea I think. Even better would be in addition to cross bolt the caps as was frequently done in aero-engines and other high class motors. This would be difficult given the thinness and weird shape of the Fulvia's crankcase!

I have been busy on the Fanalone but have terrible Internet problems and so have been lazy on my blog. The subframe is now assembled and ready to go in; I'll write it up when I have a chance.

best wishes

Paul

3.

Hi Paul,
Thanks for your replies. You might want to upload them to your Blog article.

In my 1200HF engine I have fittted M10 APR studs. Albeit not waisted like on 'your' 1600 engine. The torque value as now 8Kgm compaired to the 5Kgm of the OEM 10.9 bolts.
I have also used the omicron supplied APR conrod bolts. Expensive but since nobody knows how many times their OEM bolts were (over) torqued in their 40 year lifespan a good insurance.
I have seen the brace Vere Lancia sells and I'm not very impressed by it. Too many curves and thin spots. Can't be very stiff and it is expensive at around 400 euros. I have made one from sheet metal angle iron. See picture. Stiffer and for 5 euros it is extremely cheap!
Cheers,
william

4.

Hello.

Congratulations on what looks to be an interesting solution - the only thing about steel of course is its different coefficient of expansion from aluminium, though I suppose if there's not too much mass you shouldn't have much of a problem.

Have you run the engine since you installed the brace - and if so have you noticed any difference?

I like the idea of the studs and the special nuts look very aerospace which I am sure they are! As for con-rod bolts I used to buy 1300HF ones from Cavalitto - they weren't too expensive and at least for the 1600 Lancia said that the bolts must not be re-used, so I think you've been very wise - mind you I've got away with it for 28 years!

I'll try to post the exchanges on the blog if this rotten Internet connection ever works!

Regards

Paul

5.

I have run the engine for about 2000Kms with the brace but cannot say that there is a difference since many other parts were also modified and as I wrote in earlier mails the main bearings were found worn due dirt in the oil. That is all repaired now by grinding the crank to its first undersize and I'm now running the engine in again. But the gear box started to develop a massive oil leak last week coming from the prise shaft and this is another setback as the whole subframe assembly has to come down again in order to be able to remove the gearbox....
Keep you posted!
William

6.

Hello.

So it was dirt in the oil? I am surprised!

As for the gearbox, that of course is a common fault. The roller bearing and seal(s) are always a weak point - especially in the very early 'boxes which had only one seal.

The way I tackle the problem is to remove the engine, drain the 'box and remove the bell-housing; that way you don't have to drop the subframe - or worse, the gearbox!

Regards

Paul

7.

I do not have an engine hoist but I have a ramp so i think that removing the subrame altogether is less work and causes less risk for damaging something in the process.
The seal (double in this 1600 zagato box) is changed together with the bearing in 2006 just before the Lancia centenario in Turin. It functioned faultless for 7000kms.
Cheers,
William

8.

Yes I see.

Well, when I was fifteen years younger, my father had a Fulvia sedan. I changed his clutch in 3.5 hours - removing the engine - which is harder than on a coupé. Ah! those were the days!

I had forgotten that you had the same 'box as I. Those seals/bearings are a real pain!

Paul

Monday, April 05, 2010

More Fanalone

Hello again.

As I wrote last time, the engine dismantling revealed that certain new parts were necessary. These arrived and this weekend I built up the bottom half of the engine.

A couple of weeks ago I spent a fair amount of time cleaning the oily mess that appears in the earlier photos on this series, so with decent clean parts to work with I could get on with it. At the same time I fitted the new piston rings to the pistons having carefully checked all the gaps. Standard wisdom for water-cooled engines is "three thou per inch of bore" - roughly 0.75mm per 25mm. Every new ring in this case had about 10 - 12 thou (0.010 - 0.012" or 0.25 - 0.3mm) since there is wear in the block. Next time it will have to be a rebore.

A cleanish start!

I think I can say that I have always had trouble making Fulvia engines non-leaky: some of them are as bad as classic English motorcycles. I suppose that this is hardly surprising as the crankcase is all bolted together, and the block bolted on top. So I have taken extra-special care this time preparing all the mating surfaces: we shall see!

First, a quick word about tools. When I first started building these engines, I wondered how I could correctly tighten the block to crankcase bolts. A "crow's foot" attachment was suggested, but these are not much good if tightening torque is substantial as it is in this case - I usually tighten them (12 grade 8mm bolts on 1600s) to 25 lb/ft and use red Loctite as loosened block to crankcase bolts are a serious - and oily - pain. Here's a snap of some tools; they are all 3/8" square drive:

Bottom right is a standard 13mm "crow's foot" attachment; quite useless for this application, unless of course one wants rounded-off bolt heads. So I went back to the Snap-On man and ordered the one on the bottom left, very useful for undoing 13mm tube nuts on hydraulic lines, but no good again, because it is too bulky. Exasperated, I returned to Snap-On's catalogue and in the aircraft tools section, found the one at the top of the picture. This is spline drive and thin walled and does the job nicely so long as somebody hasn't already damaged the bolt heads. The reason is that this tool is (or was) only available in Imperial sizes, so it's ½" (12.7mm). This is good as it makes an excellent tight fit. Of course I make an allowance for the additional length when setting the torque wrench.

It was the late Harry Manning who told me to use a ½" socket rather than 13mm on the 1600 big-end bolts - again to avoid possible damage; sadly there is no equivalent option for the 12mm heads on 1300 con-rods.

Building a Fulvia bottom end is a little awkward in some ways. The crankcase of a Fulvia (as anyone who has read my Fulvia Developments series knows) is weak. It is best then to bolt as much of it together as possible, plus of course the block, before tightening finally the main bearing caps. And in any case one does not want to damage the block to crankcase gasket trying to fit the front cover with the block in place!

The recommended tightening torques for the front and rear covers are quite low, but there are many bolts (good practice this) so the total "clamp" is quite substantial.

So with the crankshaft in place and front and rear covers correctly tightened (not forgetting to install the timing chain which always gets in the way!), one "nips up" the main bearing cap nuts to stop the crank falling on one's foot whilst fixing the block to the crankcase:

Cap nuts "nipped up" ready to fit the end covers and the block

With the block fitted and the main bearing caps tightened to 60lbs/Ft or 8kg/m or 80nm, I then installed the pistons and rods. Not much to say about this except that these days I use a piston ring compressor. I know that the job can be done by feeding in the rings, but it's much less stressful using a compressor. I modified a spring steel one when installing some pistons a few years ago that were fitted with very thin and fragile rings. I simply cut the bottom of the compressor to match the angle of the vee; this works perfectly - one of course must use plenty of oil, but you knew that didn't you?

Here's a snap of the story so far - apologies for the quality:

Note the famous sand-cast large sump fitted only to Fanalones; this holds an extra litre of oil. The sump adds considerably to the rigidity of the crankcase structure. Incidentally, in this case, as is usual, the steel internal baffle was cracked: I could see where I welded it up nine years ago - and of course it cracked somewhere else, two places in fact. Soon fixed with the MIG though.

Next job is to look at cleaning the filthy subframe and to prepare the replacement gearbox for installation.

A bientôt

Sod the Law!

SMOKING IS NOT ONLY PERMITTED ON THIS BLOG - IT IS ACTIVELY ENCOURAGED

New Internet Speed test

Music and Radio Blog Club

Radio Blog Club, a good friend for a while appears to be in some legislative difficulty...

However, in tribute to its brave effort, I shall leave the existing track on this page (which amazingly still works)

Sadly my Playlist no longer works (hence its removal) thanks to the absurd "Hadopi" legislation in France. Apologies to all.