As I wrote last time, the engine dismantling revealed that certain new parts were necessary. These arrived and this weekend I built up the bottom half of the engine.
A couple of weeks ago I spent a fair amount of time cleaning the oily mess that appears in the earlier photos on this series, so with decent clean parts to work with I could get on with it. At the same time I fitted the new piston rings to the pistons having carefully checked all the gaps. Standard wisdom for water-cooled engines is "three thou per inch of bore" - roughly 0.75mm per 25mm. Every new ring in this case had about 10 - 12 thou (0.010 - 0.012" or 0.25 - 0.3mm) since there is wear in the block. Next time it will have to be a rebore.
 A cleanish start!
I think I can say that I have always had trouble making Fulvia engines non-leaky: some of them are as bad as classic English motorcycles. I suppose that this is hardly surprising as the crankcase is all bolted together, and the block bolted on top. So I have taken extra-special care this time preparing all the mating surfaces: we shall see!
First, a quick word about tools. When I first started building these engines, I wondered how I could correctly tighten the block to crankcase bolts. A "crow's foot" attachment was suggested, but these are not much good if tightening torque is substantial as it is in this case - I usually tighten them (12 grade 8mm bolts on 1600s) to 25 lb/ft and use red Loctite as loosened block to crankcase bolts are a serious - and oily - pain. Here's a snap of some tools; they are all 3/8" square drive:
First, a quick word about tools. When I first started building these engines, I wondered how I could correctly tighten the block to crankcase bolts. A "crow's foot" attachment was suggested, but these are not much good if tightening torque is substantial as it is in this case - I usually tighten them (12 grade 8mm bolts on 1600s) to 25 lb/ft and use red Loctite as loosened block to crankcase bolts are a serious - and oily - pain. Here's a snap of some tools; they are all 3/8" square drive:
 Bottom right is a standard 13mm "crow's foot" attachment; quite useless for this application, unless of course one wants rounded-off bolt heads. So I went back to the Snap-On man and ordered the one on the bottom left, very useful for undoing 13mm tube nuts on hydraulic lines, but no good again, because it is too bulky. Exasperated, I returned to Snap-On's catalogue and in the aircraft tools section, found the one at the top of the picture. This is spline drive and thin walled and does the job nicely so long as somebody hasn't already damaged the bolt heads. The reason is that this tool is (or was) only available in Imperial sizes, so it's ½" (12.7mm). This is good as it makes an excellent tight fit. Of course I make an allowance for the additional length when setting the torque wrench.
It was the late Harry Manning who told me to use a ½" socket rather than 13mm on the 1600 big-end bolts - again to avoid possible damage; sadly there is no equivalent option for the 12mm heads on 1300 con-rods.
Building a Fulvia bottom end is a little awkward in some ways. The crankcase of a Fulvia (as anyone who has read my Fulvia Developments series knows) is weak. It is best then to bolt as much of it together as possible, plus of course the block, before tightening finally the main bearing caps. And in any case one does not want to damage the block to crankcase gasket trying to fit the front cover with the block in place!
The recommended tightening torques for the front and rear covers are quite low, but there are many bolts (good practice this) so the total "clamp" is quite substantial.
So with the crankshaft in place and front and rear covers correctly tightened (not forgetting to install the timing chain which always gets in the way!), one "nips up" the main bearing cap nuts to stop the crank falling on one's foot whilst fixing the block to the crankcase:
 Cap nuts "nipped up" ready to fit the end covers and the block
With the block fitted and the main bearing caps tightened to 60lbs/Ft or 8kg/m or 80nm, I then installed the pistons and rods. Not much to say about this except that these days I use a piston ring compressor. I know that the job can be done by feeding in the rings, but it's much less stressful using a compressor. I modified a spring steel one when installing some pistons a few years ago that were fitted with very thin and fragile rings. I simply cut the bottom of the compressor to match the angle of the vee; this works perfectly - one of course must use plenty of oil, but you knew that didn't you?
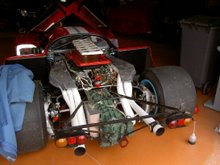
Here's a snap of the story so far - apologies for the quality:
 Note the famous sand-cast large sump fitted only to Fanalones; this holds an extra litre of oil. The sump adds considerably to the rigidity of the crankcase structure. Incidentally, in this case, as is usual, the steel internal baffle was cracked: I could see where I welded it up nine years ago - and of course it cracked somewhere else, two places in fact. Soon fixed with the MIG though.
Next job is to look at cleaning the filthy subframe and to prepare the replacement gearbox for installation.
A bientôt